Friday, 7 December 2012

Bella Cullen Transformation

If you haven't already seen my 'Bella Cullen Transformation Tutorial', then check it out below.  This post is just going to go over what products and clothes I used.


Skin:
L'oreal Infallible Foundation in 'Porcelain'
17 Shine Control Pressed Powder
MUA Undressed Palette in 'Shade 3' or 'Naked' from Urban Decay's Naked Palette
17 Limited Edition Bronzing Powder


Eyes:
Mac Paint Pot in 'Painterly'
MUA Undressed Palette in 'Shade 3' and 'Shade 5' or 'Naked' and 'Buck' from Urban Decay's Naked Palette
Estee Lauder Signature Eyeshadow Quad in '01 Sand'
Maybelline Eyestudio Geyliner in Charcoal
Barry M Shimmering Lip and Eye Crayon
Maybelline 'The Falsies' Mascara
17 Electronica Lashes


Lips:
Neutrogena Norwegian Lip Balm
No.7 Perfect Lips Pencil in 'Nude'
Barry M Shimmering Lip and Eye Crayon

Hair:
Vo5 Ultimate Hold Hairspray

Outfit:
Grey Cableknit Sweater from Old Navy (bought a few years ago but they are many similar ones available)
Dark wash jeggings or skinny jeans from Aeropostale
Black converses


If you try out this look, then tweet me a picture @JennyWelsh28


Thursday, 8 November 2012

MUA Undressed Palette vs. Urban Decay Naked Palette

I've mentioned several times before how much I love my Urban Decay Naked Palette.  I got it last Christmas and it's been used pretty much everyday since.  However, I spotted MUA's Undressed Palette in Superdrug and thought it looked pretty similar....

After comparing them, the colours and almost identical and it's ideal dupe.  It's also just £4 whilst the Naked Palette retails for £36!


The Naked Palette has a velvet cover which everything sticks to!  The MUA palette is more practical but does feel cheaper and quite 'plasticy'.  However, the MUA palette does fit much better in my makeup bag so is a great size for travelling.

The colours are even in the same order in both palettes.


The Naked Palette comes with a really nice brush whilst MUA's has the typical sponge applicator.  However, with all the money you save you could buy several excellent brushes.

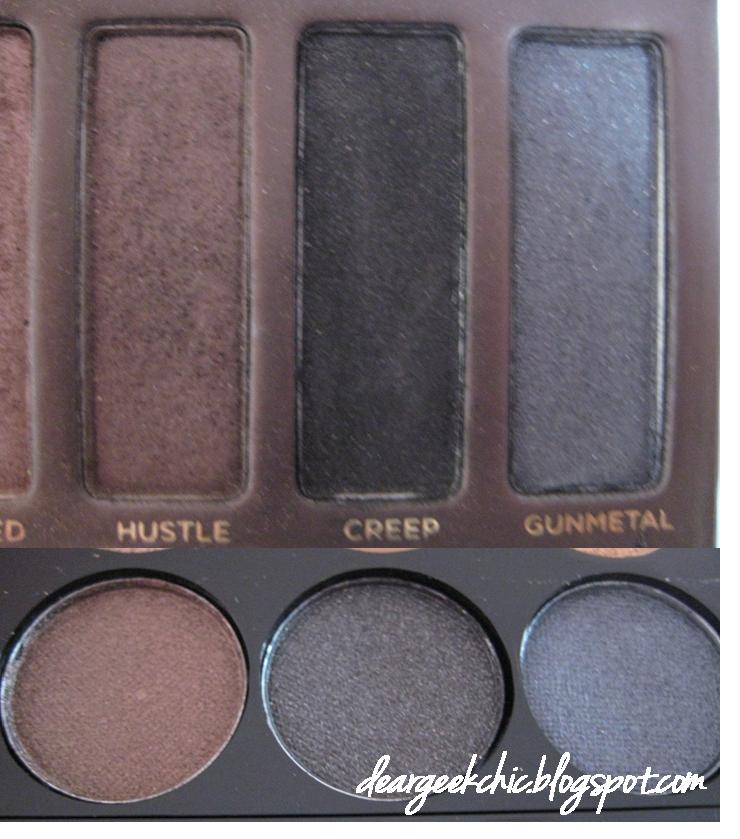
The following images are close-ups of the shades.  The Naked Palette is the top image and the corresponding dupe MUA shade beneath.


In the pan these are all pretty much identical.  Urban Decay are renowned for their quality of eyeshadows and this is normally where cheaper palettes fall down.  I swatched all the colours on my arm for you to see and I tried to use an equal amount of each shadow.


As you can see the colours come out very similar.  The only bigger difference I noticed was that 'Smog' is darker than MUA's dupe.  Also, 'Sidecar' has a difference finish.  In the Naked Palette, it has quite chunky glitter than often falls out whilst MUA's version has a much more similar consistency to the other shadows in the palette which I actually prefer.

I tried these eyeshadows out with a MAC paintpot underneath and they were pretty vibrant, I did have to apply a little more than I would with Urban Decay.  Also, they are little harder to work with and a bit trickier to blend as they aren't as creamy as the Naked Palette shades.

The MUA shades fade quicker than the Urban Decay counterparts but with a good primer or base underneath they should get you through a whole day.  

Overall, the Urban Decay Naked Palette is still my favourite but that is expected as it carries the higher price tag (£36).  However, I don't think you can go wrong with purchasing MUA's Undressed Palette as at just £4 it is an absolute steal that you won't be disappointed with.  I'm actually going to use mine for travelling as it's more convenient to take and I won't be worried about any of the eyeshadows breaking.

So if you're looking for a bargain then definitely get down to a Superdrug store and pick one of these up!


Thursday, 25 October 2012

Makeup Organisation: DIY Brush Holders

Makeup brushes can easily be left all over the place, especially if you're in a rush to get ready.  However, I've come up with a little DIY project to keep them all neat and tidy!

All you need is a jar (I used a jam one), superglue and some decorating materials!

The first one I use to keep all my face brushes together.  All I did was collect some shells whilst I was at the beach and stuck them on with superglue.  As an extra touch, I applied some glittery nail polish over the top to make it sparkle!


The other jar has eye shadow brushes in as well as my tweezers.  For this one, I stuck on silver and blue gemstones in rows around the jar.  This was a little fiddly, so I picked up the gems using tweezers before sticking them on.  I also added some sparkly nail varnish to complete this brush holder.


As an extra, you can add some beads to your brush holder for your brushes to stand in.  I don't have these though as all my brushes wouldn't fit otherwise!

I'm not an arts and crafts type person but even I managed to make these brush holders in no time at all!  Let me know in the comments if you have any decorating suggestions or ideas for future DIY projects!

Sunday, 21 October 2012

Barry M Nail Varnish in 'Strawberry Ice Cream'

Since I love my Barry M nail varnish in 'Mint Green', I went and bought another from the collection.  'Strawberry Ice Cream' is more of a summer colour but I'm a sucker for pink so got it anyway!

The polish applies really well and is a lovely, classic pink shade - I'd almost call it 'Barbie-pink!'.  I applied three coats but you could get away with just two.  The polish also lasted really well on my nails and looks really smooth and shiny!


I've also now bought 'Raspberry' by Barry M which was sold out almost everywhere!  It's a more suitable colour for Autumn so I'll upload some pictures once I've applied it.

Barry M Nail Paints retail for £2.99 and are available online as well as in Boots or Superdrug.

Friday, 19 October 2012

Makeup Organisation: Eyeshadow Quads/Mini Palettes

There came a time where I just had  to sort out my eyeshadow palettes.  I had lots of quads and mini palettes that came as part of a big set or just lots that had similar packaging.  As a result, I couldn't quickly work out which colours were in each so I ended up not reaching for them at all.

So, I decided to paint the top edge of each quad/palette with a corresponding nail varnish.  This way, it means I can tell which colours are where when they are all stacked up.


Purple nail varnish for these pretty lilac and mauve eyeshadows.


Gold nail varnish for my neutrals or metallics.


Here's the completed look!  It's much easier to find colours now and I'm reaching for these quads a lot more now!

Let me know if you have any good makeup organisation tips!


Tuesday, 16 October 2012

Maybelline Colour Show Nail Lacquer

Whilst I was in Canada I picked up a Maybelline Colour Show Nail Lacquer in 'Fierce n Tangy'.  I don't normally choose bright nail varnish (especially in yellow!) but this one was super cheap so I had to try it.

I applied two coats of the lacquer before finishing with my Sally Hansen Insta-Dri Topcoat.  I was really impressed with the opacity of this polish and the colour was really fun.  Yellow polishes are often never as they appear in the bottle so I was pleased that it was easy to achieve the same brightness as in the bottle.


The lacquer lasted really well on my nails for about a week before chipping.  I bought mine from Walmart for $2.97 so went I go back I will definitely pick up a few more colours!

Let me know if you've tried any polishes from this range :)

Monday, 8 October 2012

MUA Nail Constellations

I was really intrigued by Ciate's Caviar beads that came out a while back.  However, I could not justify spending £18 on a pack!  So, when MUA advertised their Nail Constellations at just £3 a bottle, I had to give them a go.


There are five shades in the range and I picked up 'Pisces' which is a mix of light gold and green beads.  All you do is paint your nail and whilst it is still wet, sprinkle the beads on top before pressing them down.

I found that some of the beads got stuck in the funnel and required some vigorous salt and pepper style shaking for them to come out.  Also, I would recommend using the bottom of a nail varnish bottle to press them down as some of mine got stuck to my finger and came off.


I did mine over a tray and then poured them back in my flipping the funnel top over.


I used my sister's nails to do this on and we decided to alternate between normal polish and the beads so as not to use the whole bottle in one go!

The overall look is really unique but won't last for very long.  Despite applying a topcoat, most of the beads came off whilst showering.  

They'd be great for a special night out or if you want to try something different and at just £3 they're worth a go!

You can find MUA Nail Constellations at Superdrug and I think they're currently selling for £2.50 so get in there quick!